Showing posts with label nail art. Show all posts

Sunday, November 6, 2016

Halloweek Spooktacular - The Final Chapter

I'm not going to lie, I really overextended myself this week. I decided to do this Spooktacular, came down with a terrible cold, and just wanted to spend my weekend loafing around in bed...although I also had to catch up on the housework I'd been neglecting. So yes, this post is a day late, and I'm going to avoid trying to post every day from now on because this is crazy. Today's post is just a bunch of Halloween nail art.
Here's China Glaze Getting to Gnaw you, mattified and stamped with Powder Perfect Orange Stamping polish and an image from their Halloween plate.
A collage of various spider-themed manis I did, all of which I posted on Facebook. Upper left and lower right are Pahlish Rum Runner Hibiscus, stamped with Powder Perfect White Stamping polish and the Halloween plate; lower left is ILNP BFF's, stamped with Konad White and Hehe 046 plate; upper right is Fantasy Makers Whiteout, the webs were hand-painted with Fantasy Makers Black as Knight, and the spider was built out of Butter London Gobsmacked with little red eyes made from Fantasy Makers Bloody Marie. As an aside, I tried to tag all the polishes I used in this post but I ran out of characters.
 Here's a franken I made out of Sally Hansen Pumpkin spice and orange holo craft glitter from JoAnn's Fabric. The craft glitter bled and colored the base this nice umber color, and the formula remained surprisingly workable; I think it's actually better than it was when I picked it up at the Dollar Tree. I hated the streaky jelly base and sparse glitter.
 Here's the franken stamped with Powder Perfect Golden Stamping Polish and the Halloween plate. Can you tell I really love these? I've been calling this "the franken" because when I initially made it, I thought it would be funny to call it "Pimpin' Spice." Because I pimped this polish out, get it? I have since come to realize that that is gross and I'm embarrassed to have called it that. Pimps are terrible and it's not cool to glorify them.
 Lastly, here's a polish I did for a contest in the Hella Holo Customs Facebook group, using all HHC polishes. The black is Crows Toes Sleep With One Eye Open; from left to right, the other polishes are Dreamland Lacquer Makai, Crows Toes Beyond Your Fears, Girly Bits Terra with red eyes of Powder Perfect Bruised Rose, and Dreamland Mauka.
So concludes Halloweek! Tomorrow we're back to regularly scheduled swatching of three lovely red and burgundy holos! See you later!

Saturday, October 29, 2016

Saturday Nail Art - Golden Ghosts on a Gradient

This week went wrong in more ways than one. I schedule my posts ahead of time, and it looks like I accidentally scheduled Black Holo Witch for today, when it should have gone up Friday (it was also the last of my backlog; I'm writing this on the day it goes up, and it's going up late). I also messed up when I picked the colors for this nail art...I used CbL Black Gold, Texas Tea (which was featured this week) and ILNP Black Orchid (which has black in the name, and is a holo, but wasn't part of black holo week).
I did a simple gradient with a makeup sponge. These pics look to me like I used three polishes, but the purple in the middle is just the two mixed together.
I stamped it with Powder Perfect's Golden Stamping Polish and Halloween plate, then put a border of Revlon Black Magic around the edge.
Even though I used NYC Grand Central Station, my ghosts smeared a little bit. I really do love this stamping polish; I bought all five of them, and the stamper, and the three plates, and I've been stamping my heart out lately. I'm definitely not the most skilled stamper, but I've certainly been getting a lot of practice!
Because Halloween is on Monday, and I just took a trip to Walgreen's and picked up a few new seasonal lovelies, I'm going to be posting Halloween polishes and nail art all next week! I'm calling it "Halloweek" because I am a genius. Join me Monday for my first spooky polish!

Saturday, October 22, 2016

Saturday Nail Art - Flakie Edition

So today's nail art is sort of a cheat. I really just wanted to take a bunch of pictures of Nfu-Oh #51.
Here's a collage of just bottle shots! 
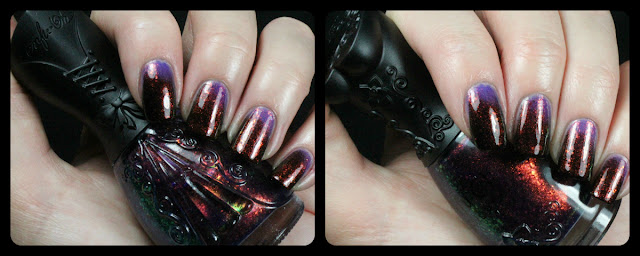
 I did do a little nail art as the base of this mani: a gradient of clear and black polish (both Wet N Wild; I tried to use China Glaze Liquid Leather, but the base was too crelly-ish). This is just a simple gradient done with a makeup sponge.
L: Before top coat
R: After top coat
Writing this post, I'm wondering why I bothered to top coat before I applied Nfu-Oh #51; I think it's because I had brushed - rather than sponged - Wet N Wild Black Creme onto the tips, and was afraid it wouldn't level. Probably not necessary, but anyway, here it is after two coats of Nfu-Oh #51.
I bought it on Amazon for $12.50. 
So I didn't get into polish until spring 2015, and a lot of the trends seemed to be in decline at the time. I feel like I was reading a lot of people expressing delight and relief that crackle and texture were going away. I don't have a single crackle in my collection, and honestly I think they're hideous. I can see how they might be useful for nail art, but I never like the look of just crackle over a color. I do have quite a few textures, but the only ones I really love are Zoya Pixie Dusts. These clear flakies were also not as popular as they once were; 2015 seems to be the year that UCC (Ultra Chameleon Chrome, which sounds awesome) started taking over, and now I see a lot of UCC flakies in holo bases. It's a wonderful time to be alive.
The bottles are shaped like ladies, it's really adorable and weird.
My point is, this polish was all the rage back in like 2012. When I started getting into polish, I was a broke college student, so my collection was strictly drug store. I think I bought this lovely lady when I was temping at my current job and $12.50 started to see, like a reasonable price to spend on amazing polish. Mostly, I was so shocked to see this come up when I searched for it on Amazon (sometimes a surprising place to find discontinued polishes: I also scored Zoya Kotori and Crystal on there) that I knew I had to get it.
In a couple of pictures, you can see my thumb, which is three coats with no undies. The flakies shift from red to green to gold over black, but suspended in the jelly, they just flicker like little chips of ruby. Mattifed, the olive to gold shift becomes more prominent, but I honestly didn't like most of the photos I took of it matte. I'm going to put in one more picture of Nfu-Oh #51 and encourage anyone who might be reading this and not in possession of this beauty to search Amazon for it. It's still on there at the time of this writing.

Saturday, October 15, 2016

Saturday Nail Art - Watermarble

I don't watermarble very often because it's very messy, and I never feel right pouring the water down the sink at the end. I don't know what else to do with it, and there's no polish in it, but it feels wrong. Anyway, I recently got a bottle of Girly Bits Border Patrol, so I decided to use it to keep my fingers clean and do a watermarble.
I started with a base of Monday's polish, Cupcake Berry Good Looking, which I wore for an entire week. I tried a couple of different combinations on my right hand; Color Club Beyond and ILNP BFF's both spread easily in the water, but Berry Good Looking didn't, and I also tried a coat of BFF's over BGL topped with a watermarble of Beyond and a clear polish...but I didn't like it. I like this way the best, which is rings of Beyond and BFF's over a base of BGL.

I don't feel like this turned out super impressive, both because the colors don't contrast and because I'm not skilled at watermarbling. It's not as hard for me as it seems to be for some people, but again, I don't do it that much, so actually drawing the patterns in the water isn't something I'm good at yet.

This week had kind of a spooky palette! A nice coincidence! Over the next couple of weeks, I'll be getting into some spooky black polishes and some Halloween specials!

Saturday, October 8, 2016

Saturday Nail Art - Are You Plaid to See Me?

So first off, you might notice in this nail art something I alluded to earlier in the week: a change in my nail shape. Yep, I filed 'em square. I did this for a few reasons; I had a peelie on my left hand that looked like it was going to get worse, I had a hard time filing my points evenly and wanted something neater-looking, and even though I never hear anyone talk about this, it's been my experience that pointy tips get tip wear faster. Your mileage may vary.
 As you probably guessed from this post's hilarious title, this week I was inspired to do some plaid nail art. Remember last week, when I inadvertently switched Zoya Bay and Cupcake Bat-chelor Pad? It actually worked out for the best this week, too. I started out by hand-painting striped of Bat-Chelor Pad and Wet N Wild Be More Pacific over a base of China Glaze Bend Over Backwards, which would not have gone as smoothly if I'd been trying to use a texture.
 I love this color scheme, makes me think of old wool blankets. I stamped with Konad White, as usual, and the plate was from Born Pretty.

To me, this is probably the most successful nail art I've had on the blog yet. I only did it on four fingers, but I would definitely recreate it maybe as an accent nail. Next week might get a little awkward, as I have three holos to swatch and the weather is starting to turn gloomy. I'm about to get daylight bulbs and invest in a second lamp so I can take better indoor pictures, since that's what I'm going to be stuck with starting in a month or so. Fortunately, next week's polishes are super sparkly, super holographic, and gorgeous in any light!

Saturday, October 1, 2016

Saturday Nail Art - In 3D

This week's nail art is either my greatest triumph, or my most abject failure. You be the judge, hypothetical reader.
OK, so I forgot to take step by step pictures of this nail art. I'll just describe what I did. For my base coat, I'm wearing 2 or 3 coats of Sinful Colors Bali Mist. For the...uh, let's call them "sculptural elements," I took my peelies of Revlon Balinese Bay and Zoya Bay and cut them up with a pair of scissors. I then used an old, gooey bottle of NYC Grand Central Station to stick them onto my nails in a random arrangement. So there you go.
The peel-off base coat I used was NYC Strip Me Off (two coats), and the pieces were fairly stiff. Still, it was possible to shape them to the contour of my nail, and they stayed on fine. I've never seen this style of nail art before, and I surely don't expect it to catch on because it's sort of gross, but if you want to try it out and put it on Instagram please let me know if you're able to come up with a clever hashtag, because it's just not happening for me tonight.

Saturday, September 24, 2016

Saturday Nail Art - Jelly Sandwich of Sorts

This week's nail art is a little bit of a hard sell. I had two polishes with holo in them, and two polishes that were a jelly finish. I did a little experimenting (outtakes at the bottom of the post) and realized that Zoya Aurora and LA Colors Atomic actually combined to make a pretty awesome deep plum.
I decided to go with a dry brush mani. I did a base coat of Aurora, then swipes of Atomic and Liquid Sky Lacquer Babi's Bur-Bindi, the polish I was afraid would clash hard with the other two. In fact, it got kind of lost in the Aurora sandwich. I knew the formula was pretty opaque in one coat, so I thought I would see if it stamped...

...and so it does! The red-brown still doesn't stand out super well against the warm purple, but maybe you can tell that these are roses. I am pretty sure this pattern was from a Born Pretty plate, although I am terrible at making a note of what plate I used or remembering what they are called.

Not sure if I would call this mani a success, or just a surprisingly pleasing failure. 
Here's the test run, when I discovered how cool the two colors look together and that Babi's could be used to stamp a lovely little fern. This was a pretty good week overall; come back next week for some stranger things.

Saturday, September 17, 2016

Saturday Nail Art - Chevrons

So, against all odds, the nail art I made from this week's polishes turned out...kind of OK?
 Nina Ultra Pro Art Walk, if you recall, is a hot pink creme with bright blue microglitter that just doesn't look right. Revlon Artsy has quite noticeable large bright blue glitter, and it seems like the colors actually go together (in a tacky sort of way). The subdued pink of Astra separating the two saturated colors ties it all together. I actually kind of like this.
I didn't remember to do a step-by-step for this art, but basically, I started with a base of Astra and then I used Scotch tape. Pretty simple. Join me next week when I finish up the A's!

Saturday, September 10, 2016

Saturday Nail Art - Green Blobs

Sounds great, right? I was pretty stuck about this nail art. I did all the swatches for this week back in August, right after I got back from vacation, and I did not think I was going to be able to make nail art for this combination of polishes. Alluring Rose was messing me up. I did swatches of a franken I'd made and was going to post those instead, but all the photos turned out crappy. Fortunately, I came to the realization that Angel Kiss is green and Appletini is green, so let's just forget about Alluring Rose and do a green-on-green blobbicure.
 I had to redo a couple of nails because the thing about blobbicures is, they take their sweet time to dry. I mean, it's a blob of polish, so yes this is common sense and I should have known better.You can also see on the ring finger where I added an extra dot of polish after I'd top coated; this was not a good idea either.
I still wouldn't go so far as to call this a nail fail, because I do like the way it turned out. Not sure why I initially thought these colors wouldn't work together. That's part of the fun of this blog anyway: giving myself permission to make ugly things! I'm also going to be swatching some fuggo polishes next week, so if you're a fan of hideous things, be sure to stop by!

Saturday, September 3, 2016

Saturday Nail Art - Stamped Textured Gradient

Welcome to Saturday Nail Art! I used two polishes from Holiday 2013 collections (OPI All Sparkly and Gold and China Glaze All Wrapped Up), but I used them to make non-holiday nail art.

I ran out of liquid latex, so I used NYC Strip Me Off as a barrier
All Wrapped Up was a bear to apply with the brush, and it dried matte but not exactly with the pebbly feel I think a polish needs to qualify as a texture. Sucking up the thick purple base with a sponge made application a lot easier, and the microglitters stood out enough to turn it into a proper textured polish.
I guess I must have been pleased with how this turned out...

...Since I took so many pictures.
After I'd done the gradient, I decided to stamp over it with Konad White. I used one Born Pretty plate and one Ejubias plate. I really like stamping over textures, I feel like it's kind of a rustic look.


I think this is one of the more successful nail art combos I've done on the blog so far. Of course, two of the polishes just happened to be textures, and I didn't try to work in Bonita All Things Blue (I thought that would be a recipe for disaster). Next week, I'll be swatching my first duochrome...well, sort of.

Saturday, August 27, 2016

Saturday Nail Art - Marbled Marble

Have I mentioned how much I love my Simply Neat mat? Well...I love my Simply Neat mat. For today's nail art, I used it to make some dry-marble decals.
I marbled Cirque Acid Wash, Nina Ultra Pro Ahoy Matey, and Essie All Access Pass together using a small brush, and sandwiched the marble between coats of Wet N Wild Clear Nail Protector. When I make decals, I always make a few extra because I know I'm going to screw up some of them. I only needed four usable ones, and here they are.
The one thing I don't love about making decals is cleaning up. I need to get some of those little curved scissors so I can trim the sides, because dissolving a large amount of decal with acetone is gross. I put down a peel-off barrier to mitigate the dryness, but I still always end up with a goopy mess on my fingers. 

I wasn't sure that All Access Pass would look good with the other two polishes, since they're blue, but I think it turned out surprisingly nice. I also did some stamping over this art, check out my Instagram if you want to see it.

Saturday, August 20, 2016

Saturday Nail Art - Cherry Blossoms

Today's nail art was done spur of the moment, after I had finished swatching the week's polishes. Word of warning: I was suffering from some noticeable dryness at this point, so a lot of these photos have been retouched. I started out pretty uninspired, and my first attempt was...uh, indefensible.
I have no idea what I was thinking with this
I saw that what I was doing was hideous, stopped myself, and thought it over. I had a beautiful neutral base, a brown creme, and a coral creme with shimmer. Suddenly, it became obvious: cherry blossoms!
In progress
I was so excited by this revelation that I didn't think to get in progress shots like last week. Basically, I just used a detail brush to draw branches using OPI A-Taupe the Space Needle, then a dotting tool to add flowers with KBShimmer A-Blazing, on a base of KBShimmer Acetone it Down. Here's a collage of the finished product, sun shots on the right and shade on the left:
I'm holding the bottle of A-Blazing in all these shots because this nail art really redeemed it in my eyes. When I swatched it, I was horrified at its pinkness. Combined with the other two colors, it read as the orangey-red I had wanted it to be all along. I really like the way this turned out, I didn't expect these colors to go together at all. Join me next week for some blues!

Saturday, August 13, 2016

Saturday Nail Art - Golden Giraffes

All the polishes this week went pretty well with each other, so I did a more elaborate look than last week. I took step-by-step pictures for this week. I can't guarantee I'll always remember to take step-by-step pics, but I will try to do it every once in a while.
I started with a base coat of Monday's polish, OPI 50 Years of Style. I decided to do a smoosh mani using 50 Years and Wet N Wild 9021Orange. I painted my ring and pinky nails using Nicole by OPI A Heart of Gold. The smoosh marbling didn't work super great because 9021Orange is much thinner than 50 Years of Style.
To combat the sheerness, I blobbed the polish directly on my nails and then smooshed it with my stamper. Eventually, I just dabbed 9021Orange onto the nail and left the blobs to dry. It's a fast dry polish, so this actually worked. In the last pic, I've got 9021Orange on A Heart of Gold, and all my nails have been mattified. At this point, I had kind of a gold and orange giraffe thing going on, which, it turns out, nicely complements the stamping image I put on last. 
Stamped with Konad Black + Wet N Wild Black Creme
BP-L010 is the strange Born Pretty stamping plate I used. On the website, it's called "Aztec Plate," yet the images are dreamcatchers and giraffes and pi inside a target that's partially covered in bacon? It's a very, uh, interesting plate. It's good quality, and picking up the images was fairly easy (even with my worn out stamper). I like the way this mani turned out! It was just dumb luck that these polishes ended up being in the same week, and I think doing this weekly nail art is going to get more challenging and I will probably end up cheating and rearranging polishes to avoid making anything too hideous. Monday will be another first: the first indie polish, not counting that horrible picture of Vapid Spellcaster in the first post.

Saturday, August 6, 2016

Saturday Nail Art - Stamping

Part of the point of this blog is to wear polishes I wouldn't have otherwise gotten around to. I've just shown swatches up to this point, but I think part of getting to really know a polish is using it for nail art. I didn't find the time to do anything really ornate this week, but I did want to see if Sally Girl 24 Karat would stamp well.
I edited this pic a bunch, but I didn't add the lens flare. That was in the picture already and I thought it looked cool.
Stamping isn't something I'm an expert at; even using a clear stamper, I have a hard time lining up the image on my nail. I used two images from the Uber-Chic succulents mini-stamp plate. I love succulents, so this was the first stamping plate I felt like I had to have. 
Stamped with Konad White and Sally Girl 24 Karat
The plate has a lot of cute images on it. I picked a design that actually appears twice on the plate in different sizes; the small one is perfectly pinkie-sized. I swear I'm going to stop blabbing about how my nails used to be long, but I actually swatched this week's polishes on them before the break. They turned out looking pretty bad, and I didn't get sunlight shots, just desk lamp. I thought I would show a couple even though they suck and I didn't edit them.
L: The plate
R: My nails dwarfed that tiny bottle :(
Join me next week when I resume swatching and eventually get to a polish whose name starts with a letter!